Apriltag specs
Contents
Apriltag specs#
What you will need
A fully operational Duckietown, compliant Autobots and a map of the Duckietown.
What you will get
The city is ready to be used for localization
Generating the map in duckietown-world#
You should already have a map as explained in Map. If not, go back and do it, as it will be necessary for the following instructions.
Adding the ground Apriltags localization to your map#
Before measuring#
This is the important part of the Apriltag specifications. You need to make sure that:
The ground Apriltags are indeed
6.5 cmx6.5 cm. If they are not, the localization system will get flawed data and thus will be useless.The ground Apriltags are very well fixed to the ground (using tape and nails). Once they are measured they should not move at all.
The ground Apriltags angles must be multiples of
45°. This will make the following much easier.
Measuring#
The measure of the ground Apriltags needs to be very precise. You should have a meter with millimeter precision.
The tiles have an internal and an external border, because of the interlocking slots. In the following, as for the map, take the inside bottom left as reference for a tile. (see We measure from the inside band from the bottom left inner corner, defined as the origin of the tile)
Each Apriltag placement will be measured relatively to the tile it is on, from the above described origin.
Always measure the center of the April tag itself.
Attention
In the map you created before, the origin is the bottom-left corner.
How to measure:#
In the following, you will be asked 5 numbers for each Apriltag:
The
xcoordinate of the tile : it is the number (starting at 0 at the first bottom left origin tile) of tile along the x-axis (bottom axis)The
ycoordinate of the tile : same as for x, it starts at 0The
xmeasure of the Apriltag on the tile : you can get it by blocking your meter in the interior left edge and measuring (in meters) the distance from the interior edge to the center of the Apriltag.The
ymeasure of the Apriltag on the tile : you can get it by blocking your meter in the interior bottom edge and measuring (in meters) the distance from the interior edge to the center of the Apriltag.The orientation of the Apriltag (in degrees) : it is
0if the Apriltag’s name is aligned normally with the x-axis (e.g. readable from the “bottom” of the map). Then it is defined with the trigonometric convention (counter-clockwise). This should normally always be in multiples of45°.
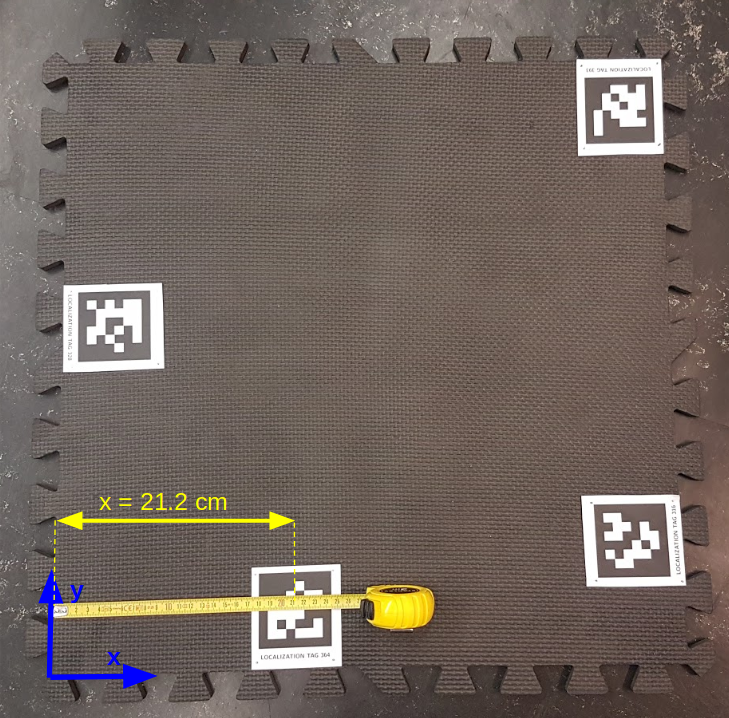
Fig. 55 We measure from the inside band from the bottom left inner corner, defined as the origin of the tile#
TODO
TODO: Add more pictures
Filling the map in#
Once you are sure of your positioning of the Apriltags, you can start measuring them. To do so:
Open a terminal inside the
duckietown-worlddirectory, as you did to create your map. Your map should still be in thesrc/duckietown_world/data/gd1/mapsfolder.
Inside the duckietown-world directory, run the following command:
python3 src/apriltag_measure/measure_ground_apriltags.py ![MAP_NAME]
Follow the instructions in the terminal : choose an Apriltag number, and fill in the 5 numbers required, as described above.
If an Apriltag was already filled in before (if you are changing your map for instance), you will be asked to confirm the overwriting of the positioning. As everything is versioned in GitHub, you can always go back to find the previous positions if need be.
If you try recording an Apriltag number than is not in the allocated range (
300-399), the script will also ask to confirm.At the end, just confirm the saving. The resulting map will be where it was before, with now the Apriltag measures added to it.
As described in the Map page, you should recompile your map and visualize the apriltags on it (easy debug to find obvious mistakes).